疫情原因,至今不允许返校。可怜今年毕业,毕业照与毕业典礼是想都不用想了,毕业答辩已经转为线上了,连毕业证也许都不能亲自去领了,真是悲哀!呆在家里都要半年了,哎,一个人是懒得是啥都不想干,想研究点东西也总是钻不进去,天天看着逐渐膨胀的身体发呆,更是悲哀啊!
神奇的 UI
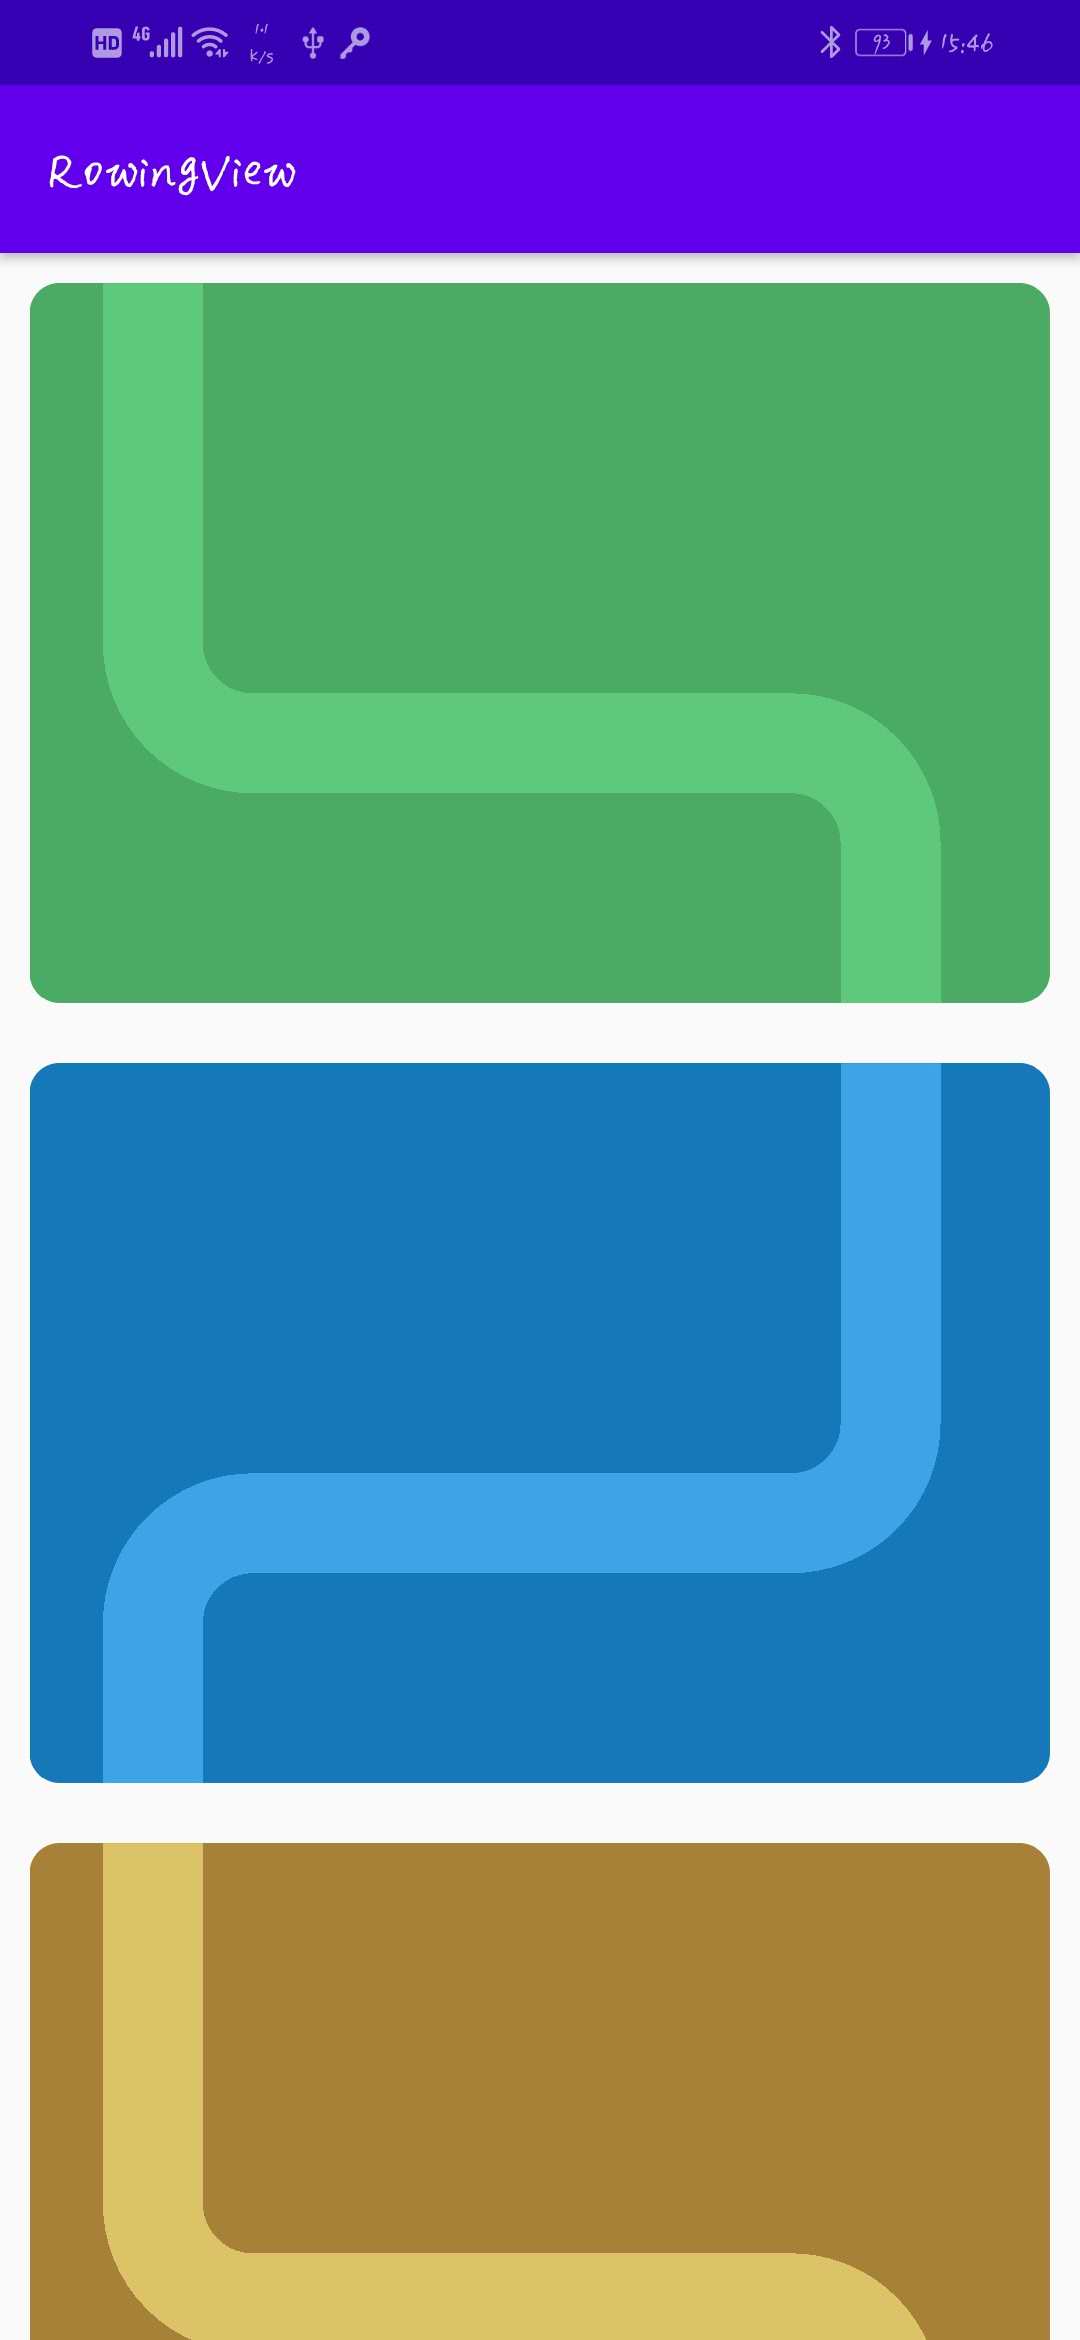
几天前看到鸿阳大神公众号上的一篇推文,里面讨论的 UI 效果也确实让我这个小白惊叹。
第一眼看上去好像没什么大不了的,不就是个列表么,仔细看下,不由得一声卧槽,这个小船!反正我看到这个 UI 效果是没有一点头绪,刚好有人已经做出来,所以就看着别人的 demo,了解下原理,然后试着自己做一个同样的效果。
整体来说搞懂三个方面的问题就可以了:
- 路径的绘制
- 小船的移动
- 滑动进度
路径绘制
通过Path类,合理运用内部方法可以创建并保存一条完整的路径。通过moveTo(x,y)方法移动路径的起始点到指定点,然后通过rLineTo(dx,dy)方法绘制一条从当前点到指定点的直线,注意此处的 (dx,dy) 坐标是相对于当前点的坐标,而lineTo(x,y)方法中的坐标使用的则是原始坐标系。
arcTo(left,top,right,bottom,startAngle,sweepAngle,forceMoveTo)方法则用来添加一段圆弧。left、top、right、bottom 参数决定圆弧位置及大小;startAngle 参数决定了圆弧的起始角度,0 度代表默认是向下;sweepAngle 参数决定了圆弧对应的度数,该数为正时代表顺时针方向,为负时代表逆时针方向;forceMoveTo 是一个布尔值,为 false 则代表如果之前路径的最后一个点与圆弧的起始点不是一个点时,会将两个点连接起来,也就是说始终是一条路径,为 true 则不会连接,则可能会变为两条路径。
完整的代码如下:
fun getPath(pos: Int, width: Float, height: Float): Path {
    val radius = 100f
    val firstHeight = height / 2
    val firstWidth: Float
    val lastWidth: Float
    if (pos % 2 == 0) {
        firstWidth = width / 8
        lastWidth = width / 8 * 7
    } else {
        firstWidth = width / 8 * 7
        lastWidth = width / 8
    }

    return Path().apply {
        moveTo(firstWidth, 0f)
        //添加直线
        rLineTo(0f, firstHeight)

        if (pos % 2 == 0) {
            //添加圆弧
            arcTo(firstWidth,
                    firstHeight - radius,
                    firstWidth + 2 * radius,
                    firstHeight + radius,
                    180f,
                    -90f,
                    false)

            rLineTo(lastWidth - firstWidth - 2 * radius, 0f)

            arcTo(lastWidth - 2 * radius,
                    firstHeight + radius,
                    lastWidth,
                    firstHeight + 3 * radius,
                    -90f,
                    90f,
                    false)
        } else {
            arcTo(firstWidth - 2 * radius,
                    firstHeight - radius,
                    firstWidth,
                    firstHeight + radius,
                    0f,
                    90f,
                    false)

            rLineTo(lastWidth - firstWidth + 2 * radius, 0f)

            arcTo(lastWidth,
                    firstHeight + radius,
                    lastWidth + 2 * radius,
                    firstHeight + 3 * radius,
                    -90f,
                    -90f,
                    false)
        }

        rLineTo(0f, firstHeight - 2 * radius)
    }
}
从 y 轴来看,firstHeight 将路径分为两部分,上面是一条直线,下面则是两个圆弧加一段直线;firstWidth 与 lastWidth 代表路径在 x 轴上的两个拐点,分别是八分之一处与八分之七处;pos 则用于区分两种不同的路径。
有了路径之后,就可以通过canvas?.drawPath(mPath, mPaint)将这段路径绘制出来。现在结合 RecycleView,完整的河道图就出来啦。
class RiverView : ViewGroup {

    constructor(context: Context) : super(context)
    constructor(context: Context, attributeSet: AttributeSet) : super(context, attributeSet)

    private val mPaint = Paint().apply { style = Paint.Style.STROKE }
    private lateinit var mPath: Path

    init {
        setWillNotDraw(false)
    }

    fun setPath(path: Path) {
        mPath = path
        mPathMeasure = PathMeasure(mPath, false)
    }

    fun setRiverColor(color: Int) {
        mPaint.color = color
    }

    fun setRiverWidth(width: Float) {
        mPaint.strokeWidth = width
    }

    override fun onLayout(changed: Boolean, l: Int, t: Int, r: Int, b: Int) {}

    override fun onDraw(canvas: Canvas?) {
        super.onDraw(canvas)
        canvas?.drawPath(mPath, mPaint)
    }
}
override fun onBindViewHolder(holder: RowingViewHolder, position: Int) {
holder.itemView.mRiverView.apply {
val width = context.resources.displayMetrics.widthPixels.toFloat() - context.dp2px(32f)
val height = context.dp2px(240f)
setBackgroundColor(data[position].cardColor)
setPath(getPath(position, width, height))
setRiverWidth(100f)
setRiverColor(data[position].riverColor)
}
}效果图如下:
小船的移动
对路径进行具体的处理,包括获取某一个进度点、该点的方向等信息,就需要用到 PathMeasure 类了。
在创建 PathMeasure 对象时,需要传入一个 Path 对象,代表需要处理的路径。
mPathMeasure = PathMeasure(mPath, false)第二个参数代表是否将 Path 处理为闭合的。也就是说,当该参数为 true 时,那么 PathMeasure 在处理 Path 时,即使传入的 Path 不是闭合的,PathMeasure 也会当做闭合的 Path 的去处理,需要注意的是,只是当做闭合的处理,而不是真的将 Path 变为闭合的,不会对原先的 Path 产生影响。
那么怎么样根据一个进度值就能使小船进行相应的移动呢,此时就需要用到 PathMeasure 中的 getLength 与 getPosTan 方法了。
//获得路径的长度
public float getLength()
//获取该路径 disance 处的点的坐标及方向的切线值
public boolean getPosTan(float distance, float pos[], float tan[])
说下 getPosTan 方法,distance 代表长度,也就是说路径 distance 处的点,这个变量可以传入progress* mPathMeasure.getLength(),progress 取值 0-1,代表进度值,这样就可以传入不同的 progress 值进行移动;pos[] 则要求我们传入一个 float 数组,当方法运行完成后该数组中就会包含此点的坐标 (pos[0],pos[1]);tan[] 同样是 float 数组,方法完成后同样会产生 tan[0] 与 tan[1] 两个值,代表了该点的方向值,怎么理解这两个值呢,此时就需要借助 Math 中的 tan 系列函数。
Math.tan(x)
Math.atan(x)
Math.atan2(y,x)
先说明一下,在代码中涉及到度数时,一般都采用了弧度去表示。弧度与度数的关系是:半径为 1 的圆中任意角度所对应的弧长,就是该角度的弧度。所以 360°对应的弧度就是 2π,180°的弧度值为π。
Math.tan(PI / 4)也就是 tan(45°),计算 45 度角的正切值,结果是 1。
Math.atan(1)也就是 arctan(1),计算正切值 1 所对应的角度,结果是 PI/4。这两个的关系就是 tan(arctan(x)) = x。
而Math.atan2(y,x)与Math.atan(x)的用途是一样的,只是传入的参数不同,这里的 y 代表角度对边的长度,x 代表角度邻边的长度,可以说 atan2(y,x) 与 atan(y / x) 得出的结果是一样的。或许看下面的图会更明白一点。
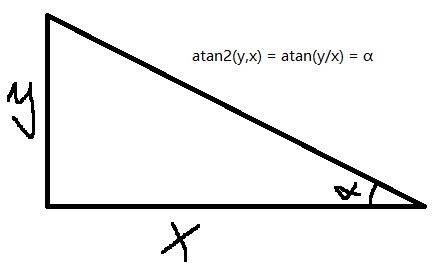
明白了这个以后,那么 tan[] 中存储的值就是 atan2(y,x) 中的 x、y 值。所以该点的旋转角度就是
atan2(mTan[1], mTan[0]) * 180 / PI由于 atan2 方法返回的是弧度值,所以通过*180/PI 将其转为对应的角度。好了,有了位置以及对应的旋转角度,就可以在 onDraw 方法中处理小船的位置及方向啦。
    fun move(progress: Float) {
        if (!this::mRowingView.isInitialized) {
            //小船
            mRowingView = RowingView(context)
            addView(mRowingView)
            mRowingView.layout(0, 0, 200, 200)
        }

        mPathMeasure.getPosTan(progress * mPathMeasure.length, mPos, mTan)
        postInvalidate()
    }

    override fun onDraw(canvas: Canvas?) {
        super.onDraw(canvas)
        canvas?.drawPath(mPath, mPaint)
        if (this::mRowingView.isInitialized) {
            mRowingView.apply {
                translationX = mPos[0] - mRowingView.width / 2
                translationY = mPos[1] - mRowingView.height / 2
                rotation = (atan2(mTan[1], mTan[0]) * 180 / PI + 180).toFloat()
            }
        }
    }
当我们调用 move 函数时,小船就会根据传入的 progress 移动到对应的位置啦。
滑动进度
好了,现在路径有了,小船也可以移动了,剩下的就是处理当手指滑动列表时,小船也要滑动对应的进度。监听 RecycleView 的滑动是不可避免的了,具体的处理代码如下。
mRecycleView.apply {
            layoutManager = mLayoutManager
            adapter = mAdapter
            addOnScrollListener(object : RecyclerView.OnScrollListener() {
                override fun onScrolled(recyclerView: RecyclerView, dx: Int, dy: Int) {
                    super.onScrolled(recyclerView, dx, dy)
                    val computeVerticalScrollOffset = mRecycleView.computeVerticalScrollOffset()
                    val distance = dp2px(240f + 10 * 2).times(mAdapter.data.size).minus(mRecycleView.height).div(mAdapter.data.size)
                    val progress = computeVerticalScrollOffset % distance / distance
                    val pos = computeVerticalScrollOffset / distance.toInt()
                    move(progress, pos)
                    post {
                        mAdapter.notifyItemChanged(pos, 1)
                    }

                }
            })
        }

fun move(progress: Float, pos: Int) {
        val holder = mRecycleView.findViewHolderForAdapterPosition(pos) as? RowingAdapter.RowingViewHolder
        holder?.itemView?.findViewById<RiverView>(R.id.mRiverView)?.move(progress)
    }
首先 computeVerticalScrollOffset 是 RecycleView 当前的总滑动长度。
然后,dp2px(240f + 10 * 2).times(mAdapter.data.size)计算了填充完数据后的 RecycleView 的高度,而mRecycleView.height表示当前 RecycleView 在屏幕上显示出来高度。之所以要减去这个,是因为小船刚开始在 RecycleView 的顶部,当我们滑动 RecycleView 到底部时,小船也需要移动到底部,这之间的距离就差了一个 Recycle 的 Height。之后除以mAdapter.data.size,得到的是每一个卡片所对应的滑动距离,即 distance。
之后,computeVerticalScrollOffset % distance获得的值表示在一个卡片上小船的进度,除以 distance 就得出了进度百分比 progress。
computeVerticalScrollOffset / distance计算出哪个卡片上的小船需要移动。有了 pos 与 progress,就知道了当前 RecycleView 的滑动进度对应的小船的滑动进度,对小船进行移动就行了。
还有一点,当小船移动到下一个卡片时,当前卡片上的小船需要消失,因此还需在 onBindViewHolder 函数中做些处理。
override fun onBindViewHolder(holder: RowingViewHolder, position: Int) {
        holder.itemView.mRiverView.apply {
            val width = context.resources.displayMetrics.widthPixels.toFloat() - context.dp2px(32f)
            val height = context.dp2px(240f)
            setBackgroundColor(data[position].cardColor)
            setPath(getPath(position, width, height))
            setRiverWidth(100f)
            setRiverColor(data[position].riverColor)
        }

        if (holder.itemView.mRiverView != lastRiverView) {
            if (lastRiverView?.initRowing() == true)
                lastRiverView?.mRowingView?.visibility = View.GONE
            if (holder.itemView.mRiverView.initRowing())
                holder.itemView.mRiverView.mRowingView.visibility = View.VISIBLE
            lastRiverView = holder.itemView.mRiverView
        }
    }
好了,现在所有的问题都解决了,小船就可以快乐的游起来了。
代码已上传至github